
EasyEngine Dashboard currently supports SSH and rsync for secure access, but not SFTP.
If you’re using Windows, here’s a simple guide to set up SSH and connect to your site.
Step 1: Generate an SSH Key on Windows (if you already have SSH Keys, go to step 2)
1. Open PowerShell (press Windows Key + S, type “PowerShell”, and open it).
Run the following command to generate a new SSH key:
ssh-keygen -t ed25519 -C "[email protected]"
2. When prompted:
Enter file location: Press Enter to use the default
(C:\Users\<username>\.ssh\id_ed25519).
Enter passphrase: Optional; press Enter if you don’t want to keep one.
3. Your keys will be saved:
Private key:
C:\Users\<username>\.ssh\id_ed25519
Public key:
C:\Users\<username>\.ssh\id_ed25519.pub
Step 2: Copy Your Public Key
Run the following command in PowerShell:
cat C:\Users\<username>\.ssh\id_ed25519.pub
Copy the entire output starting with ssh-ed25519 ....
Step 3: Add Your Key to EasyEngine Dashboard
1. Go to dash.easyengine.io.
2. Click your profile icon in the top-right corner, → Profile.

3. Go to Settings → SSH Keys.
4. Click Add New and paste your public key.

5. Click Save.
Step 4: Enable SSH Access for Your Site
1. Go to the Sites page in the dashboard.
2. Open your site and click Enable SSH.
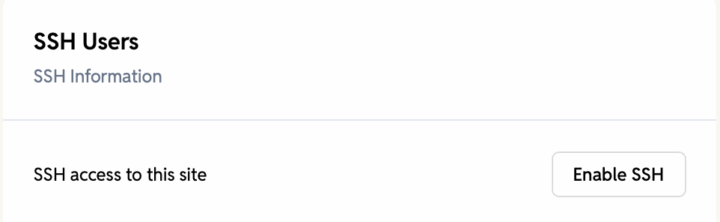
3. Wait a few seconds for the key to be added to the server.
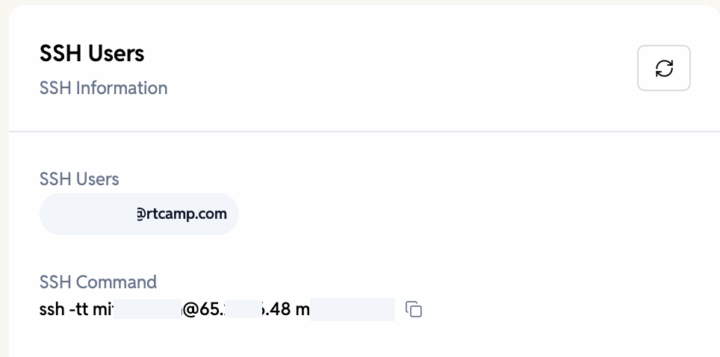
Step 5: Connect to Your Site
1. From the site details page, copy the SSH command provided (it looks like this):
ssh -tt username@server-ip sitename.rt.gw
2. Paste it into PowerShell and run it.
3. The first time you connect, type yes when asked to confirm the host authenticity.
You should now see something like:
^_^[www-data@sitename.rt.gw:~/htdocs]$
This means you are successfully connected to your site via SSH.
Notes
- If you already have an SSH key, you can skip Step 1 and just upload your existing public key.
- Keep your private key secure — never share it.
- SSH works for both site-level and server-level access in EasyEngine.